If you want to know how to do back extensions at home, you only need a mat and a few square feet of floor. The floor version trains the muscles that run along your spine and the glutes and hamstrings that support them. You don’t need a Roman chair or a 45-degree bench to start.
This guide covers the exact setup, the muscles worked, sets and reps, and the mistakes that cause trouble. You’ll also get easier and harder versions, machine-free alternatives, and a sample workout. As a result, you can build a stronger back from your living room.
QUICK ANSWER
To do back extensions at home, lie face down on a mat with your arms by your sides or hands under your forehead. Squeeze your glutes, then lift your chest 2-4 inches (5-10 cm) using your back muscles. Keep your neck neutral, pause one second, and lower slowly. Start with 2 sets of 8-10 reps.
Muscles Worked by Back Extensions at Home
Knowing which muscles you’re training helps you feel the right areas. Therefore, let’s split them into primary and supporting groups.
Primary muscles
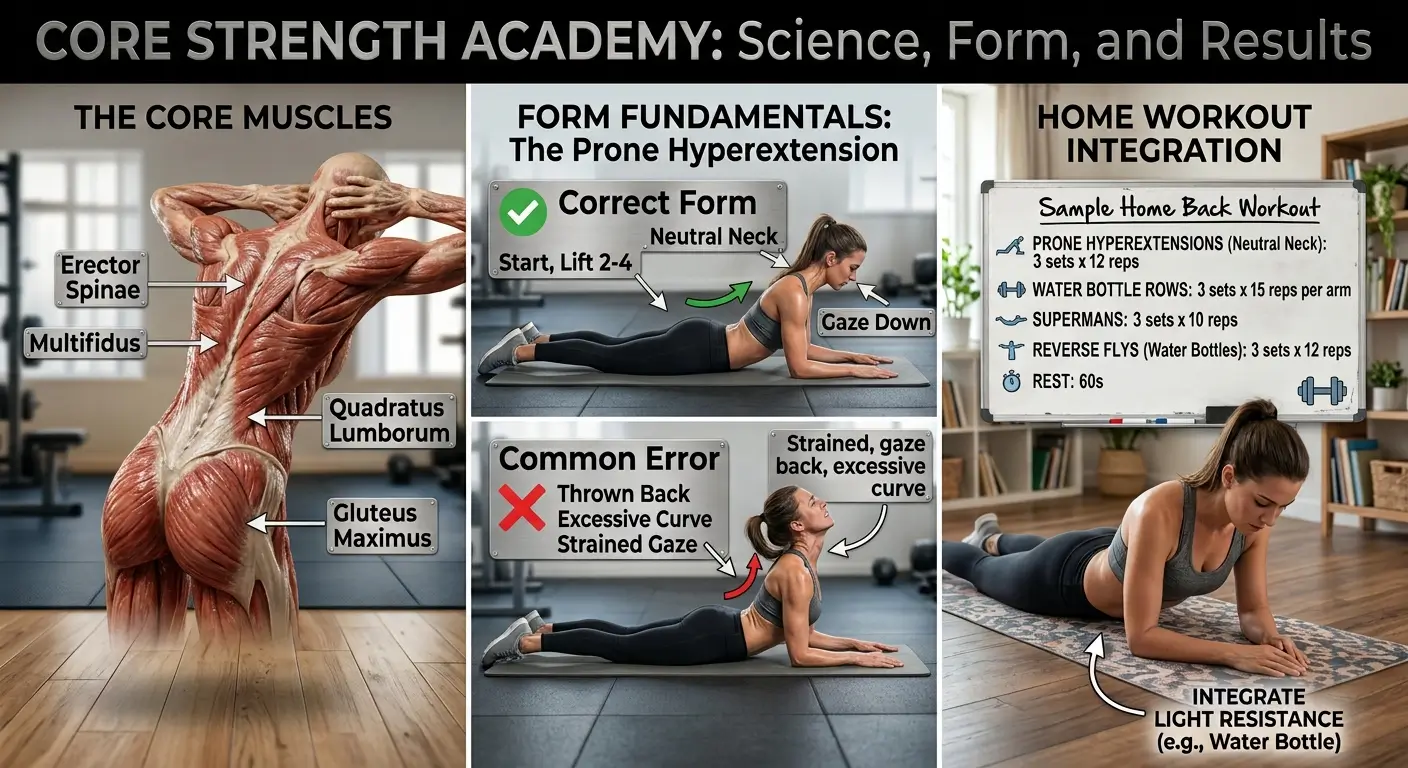
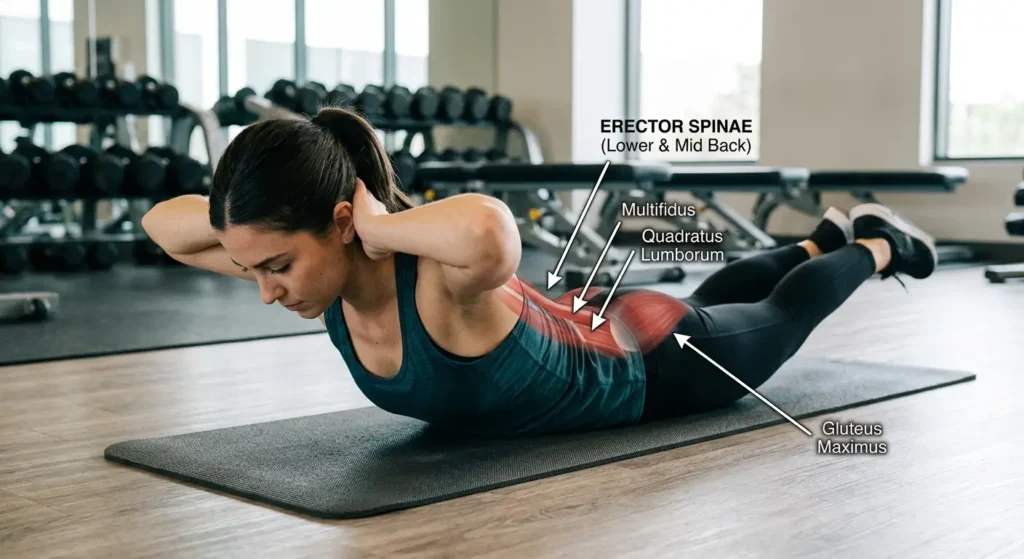
- Erector spinae: These long muscles run up both sides of your spine. They extend (straighten) your back and are the main target of this exercise.
- Multifidus: These small, deep muscles sit close to the spine. They help keep each segment stable as you move.
- Gluteus maximus: Your largest glute muscle extends the hip. It helps lift and steady your body during the rep.
Secondary and stabilizing muscles
- Hamstrings: The back of your thighs assist hip extension and help keep your legs still.
- Rhomboids and middle and lower trapezius: These upper back muscles pull your shoulder blades back and down.
- Rear deltoids: The back of your shoulders help when your arms are overhead or out to the sides.
- Abs and obliques: They brace your trunk so your lower back doesn’t over-arch.
Muscles also work as a team. In a study of prone hip extension exercises in healthy young adults, the hamstrings, spinal erectors, and glutes fired in a consistent order. In practice, this means the back, glutes, and hamstrings share the job, so you should cue all three instead of “arching” with your lower back alone.
Benefits of Back Extensions at Home
First, they strengthen the often-neglected back of your body. Many people sit most of the day and train mostly the muscles they can see in the mirror. Back extensions rebalance that, and they pair well with pulling moves like those covered in our guide to what muscles pull-ups work.
Second, they fit the standard exercise guidelines. Adults should do muscle-strengthening activity that works all major muscle groups, including the back, on two or more days a week, according to the CDC adult activity guidelines. A few sets of floor back extensions help cover that back requirement.
Third, they are easy to scale. You can change the lever length (arm position), the hold time, or the load without buying anything. Consequently, the same exercise can serve a beginner this week and a more advanced lifter later.
Fourth, they may support your back health as part of a broader plan. A large Cochrane review of exercise for chronic low back pain found moderate-certainty evidence that exercise probably reduces pain compared with no treatment, usual care, or placebo. The review looked at exercise in general, not back extensions specifically, so treat this as encouragement, not a promise.
Finally, they take very little space or time. A single set takes under a minute, and you can fit a few between meetings or while the kettle boils. If your home is small, our list of best apartment workout equipment shows compact add-ons for later.
How to Do Back Extensions at Home: Step-by-Step Form
This is the standard floor version, sometimes called a prone back extension. It works for most beginners and requires only a mat.
What you need: A mat about 0.5 inch (1.3 cm) thick, or a carpeted floor. A folded towel under your forehead is optional.
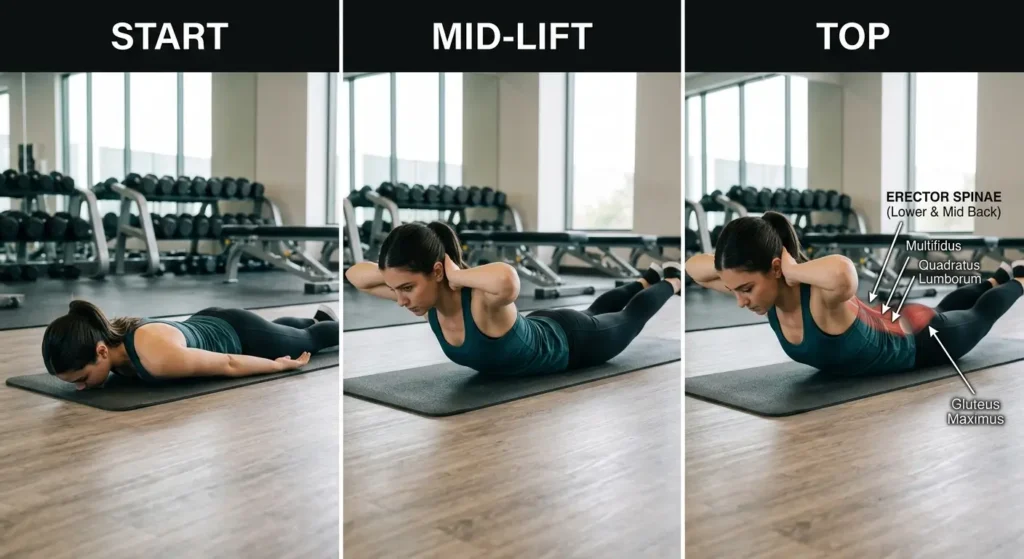
- Lie face down. Place your legs straight behind you, hip-width apart, with the tops of your feet on the floor. Rest your forehead lightly on the mat or a towel.
- Place your arms. For the easiest version, keep your arms by your sides with palms down. If that feels too easy, place your hands under your forehead, one over the other.
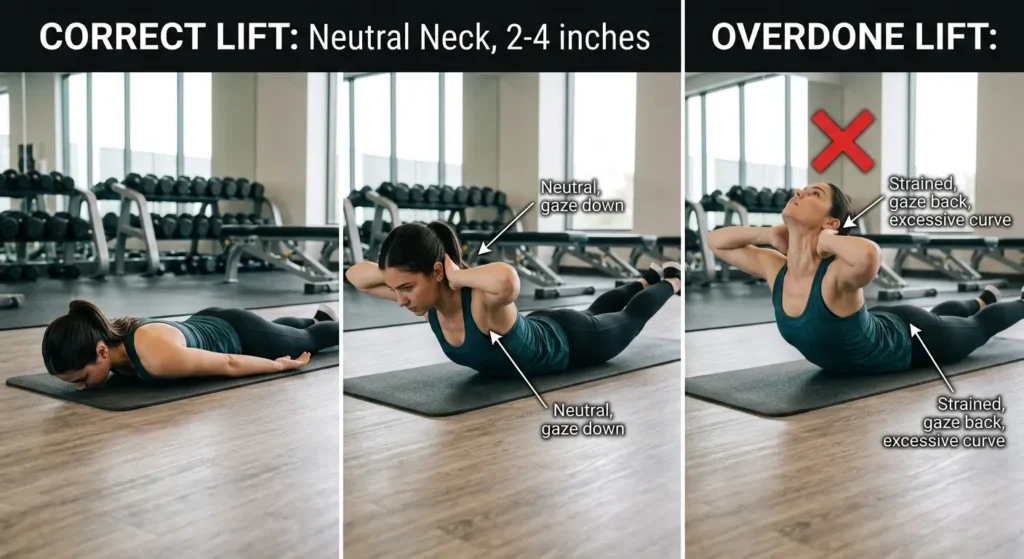
- Set your neck. Look at the floor, a few inches (about 5-8 cm) in front of your hands. Tuck your chin slightly so the back of your neck stays long.
- Brace gently. Squeeze your glutes about 30-40% as hard as you can. Then lightly draw your belly button away from the floor, as if bracing for a light poke.
- Lift your chest. Exhale and raise your chest and head together about 2-4 inches (5-10 cm). Lead with your breastbone, not your chin.
- Pause at the top. Hold for 1-2 seconds. Your hips and thighs should stay on the floor, and your ribs should stay in line with your neck.
- Lower slowly. Inhale and return to the floor over about 3 seconds. Rest your forehead down and relax for a beat before starting the next rep.
COACH’S TIP
Think “grow tall,” not “lift high.” Imagine someone is gently pulling the crown of your head forward, away from your feet. This keeps the movement spread across your whole spine instead of cranking one sore spot in your lower back.
What Back Extensions at Home Should Feel Like
You should feel a steady, working sensation along both sides of your spine, plus some effort in your glutes. Your hamstrings may help a little. A mild burn at the end of a set is normal.
However, a pinch, sharp pain, or pressure in your lower back is a sign to stop. Lower your lift height, reset your glute squeeze, and try again. If the pain returns, skip the exercise and speak with a doctor or physical therapist.
Tempo and breathing
Use a controlled tempo: 2 seconds up, 1-2 seconds pause, 3 seconds down. Exhale as you lift and inhale as you lower. Avoid holding your breath, because that tends to make you rush the rep.
How high should you go?
Higher is not better. A lift of 2-4 inches (5-10 cm) is plenty for most people. In fact, in a lab study comparing trunk-training exercises, back and hip extension moves produced only moderate activity in the spinal extensor muscles, with higher activity near the end of the range. That’s useful information: you don’t need a big range to get a real training effect, and you can raise the challenge in safer ways (holds, lever length, load).
Sets and Reps for Back Extensions at Home
Your goal decides how you set the volume. Start with the beginner row and move down the table as you gain control.
| Goal | Sets | Reps or hold | Load | Rest | Tempo |
|---|---|---|---|---|---|
| Beginner starter | 2 | 8-10 reps | Body weight, arms by sides | 45-60 sec | 2-1-3 |
| Strength | 3-4 | 6-8 reps | Body weight with arms overhead, or 5-10 lb (2.3-4.5 kg) held to chest | 90 sec | 2-2-3 |
| Muscle growth | 3 | 10-15 reps | Body weight to light load | 60 sec | 2-1-3 |
| Endurance and posture | 2-3 | 12-20 reps or 15-30 sec holds | Body weight | 30-45 sec | 1-1-2 |
These are starting points, not rules. Stop each set 2-3 reps before your form falls apart, and keep the effort smooth instead of grinding. If your lower back feels tired before your glutes and upper back do, shorten the set.
For frequency, 2-3 non-consecutive days a week works well for most beginners. Because the spinal muscles recover from light bodyweight work fairly quickly, there’s no need to push every day. Instead, add small increases every week or two, such as one more rep, a 1-second longer hold, or a harder arm position.
Common Mistakes With Back Extensions at Home (and Fixes)
COMMON MISTAKE
Cranking the neck back and lifting as high as possible. This puts the pressure on your lower back and the back of your neck instead of spreading it along the spine. Fix it by keeping your eyes on the floor, lifting just 2-4 inches (5-10 cm), and imagining a long line from your head to your tailbone.
Beyond that, watch for these frequent errors:
- Swinging or bouncing. Momentum takes the work off your muscles. Lift for two seconds and lower for three, every rep.
- Lifting the legs too early. Raising your legs and chest together turns this into a Superman. Master the chest-only lift first.
- Forgetting the glutes. Without a glute squeeze, the lower back does the work alone. Squeeze gently throughout the set.
- Shrugging the shoulders. If your shoulders creep toward your ears, your upper traps are taking over. Pull your shoulder blades gently down and back.
- Holding your breath. Breath-holding makes the neck and face tense. Exhale up and inhale down.
- Doing too much too soon. Soreness along the spine the next day is common, but sharp or lingering pain is not. Start with 2 sets and build from there.
- Skipping the abs. Back-only training can leave the front of the trunk behind. Add core work, such as the moves in our guide on how to flex your abs, so both sides stay balanced.
If you spend long hours at a desk, your upper back may also need attention. Pair back extensions with rows or the seated bent-over rear delt raise to help keep your shoulders from rolling forward.
Back Extensions at Home: Easier to Harder Variations
Easier versions (regressions)
- Mini lift (1-2 inches / 2.5-5 cm): Lift only until you feel your back muscles switch on. This is a fine starting point for the first week or two.
- Pillow under the hips: Place a thin pillow or folded towel under your pelvis for comfort. It eases pressure on the lower back, so you can focus on the movement.
- Hands-by-sides position: Keep your arms close to your body. This shortens the lever and makes the lift lighter.
- Bird dog: On hands and knees, extend one arm and the opposite leg while keeping your trunk still. According to Harvard Health, the bird dog is performed on hands and knees and is highly effective for strengthening the core muscles that stabilize the spine. The ACE exercise library entry also advises never raising the limbs higher than you can control without your low back sagging.
Standard version
The arms-by-sides or hands-under-forehead lift described above is your baseline. When you can complete 3 sets of 12 reps with a smooth 3-second lowering and no neck strain, you’re ready to progress.
Harder versions (progressions)
- Longer pauses. Hold the top position for 3-5 seconds. This builds endurance without adding any equipment.
- “Y,” “T,” and “W” arm positions. Reach your arms overhead (Y), straight out to the sides (T), or bent with elbows tucked (W). The longer the lever, the harder the lift, so progress in that order: W, T, then Y.
- Superman. Lift your arms and legs together about 3-4 inches (8-10 cm). It trains the glutes and hamstrings more, but it requires better control.
- Added weight. Hold a light dumbbell, water bottle, or backpack against your chest. A load of 5-10 lb (2.3-4.5 kg) is plenty at first, since small amounts get heavy quickly in this position.
- Stability ball version. Drape your hips over a ball about 22-26 inches (55-65 cm) wide with your toes pressed against a wall, then lift your torso. This adds a balance challenge, so use a wall and a slow tempo. Choose a ball size that suits your height [VERIFY].
- Isometric holds with a band. Loop a light resistance band under your hands or around your upper back and anchor it securely, then hold the top position for 10-20 seconds.
Back Extension Alternatives
You won’t always want to lie on the floor. Fortunately, there are good swaps for every setup.
| Equipment | Alternative | Why it works |
|---|---|---|
| No equipment | Bird dog | Trains spinal control with less spinal movement. A good starting point for beginners. |
| No equipment | Glute bridge | Targets the glutes and hamstrings with your back neutral. Our isometric leg exercises guide has related holds. |
| No equipment | Prone cobra (arms off the floor) | Teaches the same lift with a longer lever. |
| Dumbbell or kettlebell | Good morning or Romanian deadlift | Strengthens the posterior chain through a hip hinge. See whether kettlebell swings work your abs for a related hinge pattern. |
| Cable or band | Pull-through | Trains the hip hinge with steady tension. |
| Machine | 45-degree back extension bench or Roman chair | Allows heavier loading and a longer range of motion. |
| Machine | Reverse hyperextension | Targets glutes and hamstrings with less spinal loading. |
Bodyweight options can also fit into a bigger plan. For ideas on building a full routine without equipment, see our calisthenics exercises list.
If you like a slower, controlled style, Pilates-based movements train similar muscles. Our Pilates chair workout guide covers beginner-friendly instruction.
Who Should Be Careful With Back Extensions at Home
Floor back extensions suit many healthy adults. Even so, some people should get medical advice first.
- Current or recent back pain, a herniated disc, or spinal conditions: Ask a doctor or physical therapist before starting. Some conditions respond poorly to repeated arching.
- Osteoporosis or low bone density: Check with your doctor about which spinal movements are appropriate.
- Recent surgery: Get medical clearance first.
- Pregnancy or postpartum: Lying face down is usually uncomfortable and may not be advised. Ask your healthcare provider for safe alternatives.
- Numbness, tingling, or pain running down a leg: Stop and seek medical advice.
- Older adults and complete beginners: Start with the mini lift or the bird dog, and progress slowly.
Mild muscle fatigue is normal. In contrast, sharp, pinching, or radiating pain is a signal to stop. Warm up first with a few minutes of walking, cat-cow movements, and a handful of glute bridges.
Sample Workout With Back Extensions at Home
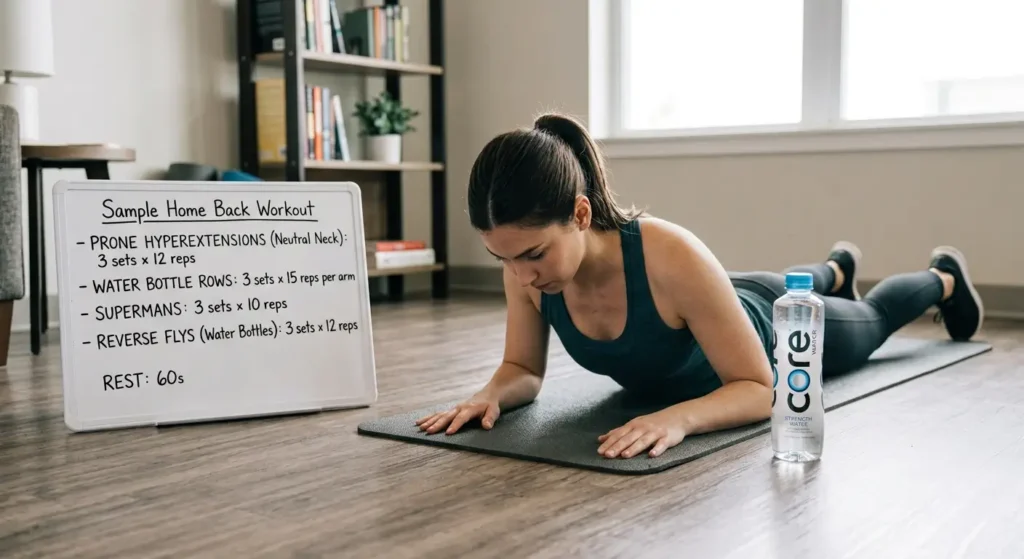
Here is a simple 25-30 minute session you can do 2-3 days a week. It trains your back, glutes, and core without equipment, and it supports the CDC’s guidance on muscle-strengthening activity at least two days a week.
Warm-up (4-5 minutes): March in place for 2 minutes, then do 8 cat-cow reps and 10 glute bridges.
| Order | Exercise | Sets | Reps or hold | Rest |
|---|---|---|---|---|
| 1 | Floor back extension | 3 | 8-12 reps | 45-60 sec |
| 2 | Bird dog | 2-3 | 6-8 per side | 45 sec |
| 3 | Glute bridge | 3 | 12-15 reps | 45 sec |
| 4 | Forearm plank | 2-3 | 20-40 sec | 45 sec |
| 5 | Side plank | 2 | 15-25 sec per side | 30 sec |
Cool-down (3-4 minutes): Child’s pose for 30 seconds, then a gentle knees-to-chest stretch for 20-30 seconds. Breathe slowly through your nose.
Progression plan: Stay at the same level until you can finish all sets with smooth form and 2-3 reps in reserve. Then change one variable: add 2 reps, hold the top for 1 more second, or move to a longer arm position. Change only one thing at a time so you can tell what works.
Frequently Asked Questions
How do you do back extensions without a machine?
Lie face down on a mat with your arms by your sides or hands under your forehead. Squeeze your glutes, then lift your chest 2-4 inches (5-10 cm) with your eyes on the floor. Pause for one second and lower slowly. Start with 2 sets of 8-10 reps.
What muscles do back extensions work?
Back extensions mainly work the erector spinae along your spine, with help from the glutes and hamstrings. The upper back muscles and the core also work to stabilize your body. Cue all of these muscles together instead of arching from the lower back alone.
Are floor back extensions effective?
Yes, they can be a useful starting point, especially for beginners. Floor versions teach spinal control and build basic back endurance. For more challenge, use longer arm positions, longer holds, or light added weight before moving on to a machine or heavier hinge exercises.
How many sets and reps of back extensions should I do?
Beginners can start with 2 sets of 8-10 reps, two or three non-consecutive days a week. As control improves, work toward 3 sets of 10-15 reps or timed holds of 15-30 seconds. Stop each set before your form breaks down.
Can back extensions hurt your lower back?
They can if you lift too high, rush, or already have a back issue that is aggravated by arching. Keep the lift small, move slowly, and engage the glutes. Stop if you feel sharp or radiating pain and check with a doctor or physical therapist.
What can I use instead of a back extension machine?
Try a bird dog, glute bridge, or Superman on the floor. You can also use a stability ball for a more challenging version, or dumbbells for good mornings and Romanian deadlifts. These work the same muscle groups without a machine.
Conclusion
Now you know how to do back extensions at home with nothing more than a mat. Focus on a small, controlled lift, a gentle glute squeeze, a neutral neck, and a slow lowering phase. Start with 2 sets, then progress with holds, longer arm positions, or light weight as your control improves.
Pair this exercise with core and upper back work, and train two or three non-consecutive days a week. Consistency and good form will matter far more than lifting high. If you have back pain, an injury, or a medical condition, check with a doctor or physical therapist first.
